Roasted Cauliflower Curry

cauliflower curry.jpg

The base of this recipe comes from the boys at “The Happy Pear”. Two lovely lads from Ireland, who happen to be identical twins, and who are seriously passionate about all things plant based. I’ve refined it a little for my taste (tasty, light and not too spicy!) and to suit the vegetables that I can easily access in New Zealand. It’s a fantastic recipe when you’re looking for a big hit of veges and wicked flavour.

People with gut health problems often steer clear of curries. I think the key to a happy gut while eating curries is to minimise the chilli so it’s only lightly spiced, avoid rice altogether opting instead to plate your curry on a bed of spinach or other greens, and make sure that your curries are dairy-free. I also avoid all curries with meat, as the spice and the heavy protein can put problem guts into overload.

Check out the boys from The Happy Pear when you’re looking for comfort food recipes that are all plant based. If I’m looking to convert a staunch meat eater into a vegetarian with one meal, The Happy Pear is my go to!

Roasted Cauliflower Curry

Serves 4

Ingredients:

  • 2-4T coconut oil (or other vegetable oil of your choice)

  • 1 shallot or 1/2 white onion

  • 2 cloves garlic

  • 1 red chilli (take out the seeds)

  • 1/2 thumb sized piece of grated ginger

  • 1/2 head of cauliflower

  • 1 carrot grated

  • 1 zucchini grated

  • 1 red capsicum sliced into bite sized pieces

  • 1 cup of green beans chopped into bite sized pieces

  • 200ml of coconut milk

  • 200ml vege stock

  • 1.5 T black mustard seeds

  • 1T ground tumeric powder

  • 1T cumin seeds

  • 1 tsp garam masala

  • juice of 1/2 lemon

  • Salt and pepper to taste

  • Serve on a bed of baby spinach or other raw greens

Directions:

  1. Preheat the oven to 200 degrees C.

  2. Chop the cauliflower into bite sized pieces and place on a baking tray with 2T oil mixed through. Salt generously and oven bake for 15mins.

  3. Chop the shallots or onions, grate the carrot, ginger and zucchini, and slice the capsicum and chilli.

  4. Heat a large non-stick frypan and firstly temper the dry spices for 2-3mins, by placing them in the dry hot pan and stirring them. Add 1-2 T of oil (coconut or other vegetable oil of your choice) and the shallots/onions, garlic, ginger and chilli. Stir fry this combo in the spices for 3-4mins.

  5. Add the cauliflower to this mix, once it has finished baking in the oven. Coat the cauliflower well with the spice mix. Next add the grated carrot and courgette.

  6. Add the coconut milk and the vege stock. Bring to the boil, and then reduce to a simmer for approximately 20 mins.

  7. Take the curry off the heat and add the green beans. Mix then evenly through the curry and allow to sit for 5 mins.

  8. Add the lemon juice at the very end and season to taste.

  9. Plate in bowls on a bed of baby spinach.

Instant Carrot and Apple Bircher

IMG_2236-1.jpg

This recipe comes from the Two Raw Sisters second cookbook. I really love a proper Bircher Museli but I’m rarely organised enough to prepare it the night before. Many of the recipes are also incredibly sweet, which doesn’t support a healthy microbiome. This version contains grated carrot, which is naturally sweet and contains phytochemicals that your gut loves!

Instant Carrot and Apple Bircher

Serves 2

Ingredients:

  • 1 cup of rolled oats (or a combo containing brown rice flakes, coconut chips and rolled oats)

  • 1 small apple, grated

  • 1 medium carrot, grated

  • 1 -1 1/2 cups of nut, oat or coconut milk of your choice

  • 2T raisins

  • 1T chia seeds

  • 1 tsp ground cinnamon

  • 1 tsp ground ginger

  • 1 tsp honey

  • Juice of 1/2 lemon

Directions:

  1. Place all the ingredients in a bowl. As you place the apple in the bowl, squeeze the juice from the apple over the oats.

  2. Stir until well combined.If the mixture is too dry add the extra 1/2 cup of nut milk.

  3. Divide into two bowls and add your desired toppings. This could be fresh fruit or nuts and seeds such as walnuts, sunflower seeds, pumpkin seeds, hemp seeds.

  4. This will keep in an airtight container in the fridge for up to 5 days.

Salted Caramel Smoothie

Vegan-Banana-Salted-Caramel-Smoothie-2.jpg

OMG!!! This recipe is the closest thing I’ve tasted to Salted Caramel Icecream. In reality I think it tastes better than icecream, because you don’t have the thick congesting aftertaste or the bloat. Salty and sweet - YUM!

The recipe was created by Jessica Sepel from JHS Health. Her cookbooks are rock star if you’re looking for a balanced approach to nutrition and excellent recipes. This smoothie Is best enjoyed as a sweet treat. It contains a lot of natural sugars, so probably won’t sustain you if you use it as a meal substitute. But it tastes incredible!!!

Salted Caramel Smoothie

Serves - 1 large glass

Ingredients:

  • 1 cup almond milk

  • 1 banana (frozen if possible as it makes the smoothie creamier, but it’s not essential)

  • 1tsp chia seeds

  • 7 dates

  • 1/2 tsp himalayan sea salt or other good quality salt

  • 1T hulled tahini or almond butter

  • 1/2 tsp of vanilla

  • 4 ice cubes

Directions:

  • Place all the ingredients in a high speed blender and blend until smooth. It may take a little while for your dates to completely blend.

Eggplant Stew

Eggplant Stew.jpg

This greek style bean stew is the vegan alternative to a lamb shanks casserole or something similar. It’s hearty and warming, full of vegetable goodness and fibre, and super tasty. It’s a powerful recipe for feeding your microbiome all the goodness it needs to thrive.

The original recipe contained chickpeas, which can be irritating to an inflamed gut, so I’ve replaced the chickpeas with cannellini beans. You could also use butter beans, or any other beans that take your fancy.

Eggplant Stew

Serves up to 6 people

Ingredients:

  • 500g eggplant, cut into cubes

  • Salt

  • Extra Virgin Olive Oil

  • 1 large yellow onion, chopped

  • 1 green pepper, stem and innards removed, diced

  • 1 carrot, chopped

  • 6 large garlic cloves, minced

  • 2 dry bay leaves

  • 1 to 1 1/2 tsp sweet paprika OR smoked paprika

  • 1 tsp organic ground coriander

  • 1 tsp dry oregano

  • 3/4 tsp ground cinnamon

  • 1/2 tsp ground turmeric

  • 1/2 tsp black pepper

  • 400g can chopped tomato

  • 400g can of cannellini beans

  • Fresh herbs such as parsley and mint for garnish

Directions

  1. Heat oven to 200 degrees celsius on fan bake.

  2. Place eggplant cubes in a colander over a large bowl or directly over your sink, and sprinkle with salt. Set aside for 20 minutes or so to allow eggplant to “sweat out” any bitterness. Rinse with water and pat dry.

  3. In a large fry pan or cast iron pot, heat 1/4 cup extra virgin olive oil over medium-high until shimmering but not smoking. Add onions, peppers, and chopped carrot. Cook for 2-3 minutes, stirring regularly, then add garlic, bay leaf, spices, and a dash of salt. Cook another minute, stirring until fragrant.

  4. Now add eggplant, chopped tomato and cannellini beans. Stir to combine.

  5. Bring to a rolling boil for 10 minutes or so. Stir often. Remove from stove top, cover and transfer to oven.

  6. Cook in oven for 45 minutes until eggplant is fully cooked through to very tender. (While eggplant is braising, be sure to check once or twice to see if more liquid is needed. If so, remove from oven briefly and stir in about 1/2 cup of water at a time.)

  7. When eggplant is ready, remove from oven and add a generous drizzle of olive oil, garnish with fresh herbs (parsley or mint).

Banana Bread

IMG_1927 2.jpg

This recipe is to die for. Sweet and moist but refined sugar free, it’s seriously dangerous to have in the house. But it proves that you can bake tasty treats without the nasties.

The recipe is from one of my favourite healthy chefs - Teresa Cutter. She has a number of cookbooks, E-Books and an app, and her recipes are often gluten, dairy and refined sugar free. Check out her website The Healthy Chef!

The Healthy Chef Banana Bread

Ingredients:

3 ripe bananas, smashed

3 organic eggs

1/3 cup maple syrup or honey

5T extra virgin olive oil

2 teaspoons vanilla extract

1/2 teaspoon ground cinnamon

2 teaspoons gluten free baking powder

2 cups almond meal

Directions:

  • Preheat your oven to 160°C - fan forced.

  • Combine smashed banana, honey, oil, cinnamon, vanilla, eggs and baking power.

  • Add the almond meal and mix well.

  • Lightly oil one loaf tin and then coat liberally with an extra almond meal or desiccated coconut - this will prevent the cake from sticking. The size I used was: 10 1/2 cm wide and 26 cm long.

  • Spoon batter into the tin and bake for 45  minutes.

  • Cover the top with foil if over-browning.

  • Remove from the oven and allow to cool before turning out the loaf.

  • Keeps in the fridge covered for up to 1 week.

Baked Apples and Coconut Yoghurt

baked apple.jpeg

This trade secret is a party favourite! Clean as a whistle and gluten, dairy and sugar free, this recipe is a winter dessert favourite.

It contains three ingredients - apples, dates and coconut yoghurt, and can be whipped up in 15 minutes from ingredients that I usually keep in my fridge.

Did I mention that it’s also delicious! Best enjoyed with tart apples like Granny Smith, but can easily be whipped up with any apples you have sitting in the fruit bowl.

The only tricky bit is learning to de-core an apple without maiming yourself! Check out this video. Use the first technique using a sharp knife and leaving your apples whole. The second technique works if you have an apple corer.

Baked Apples and Coconut Yoghurt

Makes 4 servings

Ingredients:

  • 4 Granny Smith apples (or other type of apple that is preferably a little tart)

  • Dates - as many as you are able to stuff in the hollowed out core of the apple - the more the better

  • Optional: cinnamon

  • Coconut yoghurt to serve

Directions:

  • Preheat the oven to 200 degrees celcius.

  • Decore the apples as shown in the how to video above.

  • Stuff the hollowed out core of each apple with dates - as many as possible. The dates will caramelise on baking.

  • Sprinkle with cinnamon powder.

  • Bake for 20mins or until the apples are bulging out and soft throughout.

  • Serve with coconut yoghurt on the side.

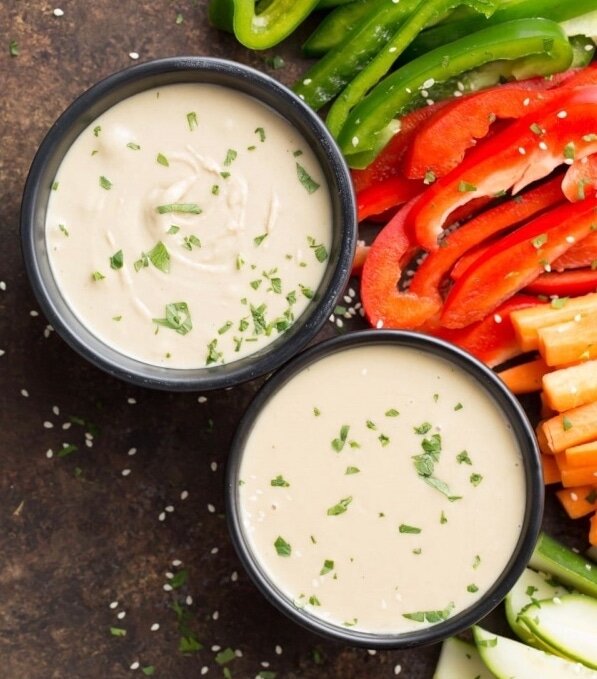
Little Bird Tahini Dressing

tahini.jpg

This recipe by Megan May at Little Bird is an absolute staple. Tahini dressing packs a punch from a nutrient density perspective, as well as a taste perspective.

It’s the perfect accompaniment to salad, steamed veges, or as a pasta sauce with legume or gluten free pasta. Even better it will last in the fridge for at least a month, so I make it up regularly so it’s on hand to use when I’m whipping up a 10min meal.

The large majority of your store bought sauces contain a whole heap of nasties - preservatives such as sulphites, acidity regulators, colourings and flavourings. This tastes way better, lasts for ages, and won’t kill your gut with all those yucky chemicals.

Tahini Dressing

Makes 2 cups

Ingredients:

  • 1/3 cup filtered water

  • 1/2 cup tahini

  • 1/4 cup apple cider vinegar

  • 2T tamari

  • 2T lemon juice

  • 1/2T sea salt

  • 1 medium sized garlic clove

  • 1T white sesame seeds

  • 2/3 cup olive oil

  • 1T finely chopped parsley

  • 1T finely chopped chives

Directions:

  1. Combine all ingredients except for the oil, parsley and chives in a blender and blend on high for 30 seconds until smooth.

  2. Turn blender down to medium and slowly pour in the olive oil until fully incorporated. Remove dressing from the blender and fold in chives and parsley.

  3. Use immediately or keep in the refrigerator for 3-4 weeks.

Broccolini and Satay Sauce

For those who are struggling with lots of wind, you should know that the Brassica family - cabbage, cauliflower, broccoli and kale can be quite gas causing in the gut, in some individuals (definitely not all!). Yet these vegetables contain the phytonutrients that are going to heal the gut - what to do?

Just be aware of how often and how much of the Brassicas you are having, and if wind is an issue look to reduce the frequency or volume. That said, a portion of Brassicas every day is a recipe for amazing health - especially in winter!

This recipe uses broccolini. which I find much easier to digest than broccoli, and the satay sauce is absolutely delicious. It comes from Jessica Sepel, an Australian nutritionist, whose app and cookbooks are fantastic sources of easy wholefood recipes.

Broccolini and Satay Sauce

Serves 2-4

Ingredients:

  • 12 stalks of broccolini

  • 2T olive oil

  • 2T sesame seeds

  • 1tsp chilli flakes

Satay Sauce

  • 2T peanut butter

  • 1 tsp tamari

  • 1/4 cup water

  • 1 tsp honey

Directions:

  1. Preheat the oven to 180 degrees celcius.

  2. Arrange the broccolini on a baking tray, and coat with olive oil. Season generously with salt and sprinkle with sesame seeds and chilli flakes.

  3. Roast for 15-20mins until the broccolini is crunchy.

  4. To make the dressing, whisk the peanut butter, tamari, hot water and honey in a small bowl. Add more water if necessary to reach the desired consistency.

  5. Drizzle the satay sauce over the cooked broccolini and serve.

Roasted Carrots with Dukkah

gks_roasted_carrots_02.jpg

We often remember to roast kumara and potato, but the trusty carrot is often forgotten. Even less popular is the parsnip, which is super sweet when roasted and incredibly tasty.

This recipe comes from my favourite vegetarian food blog - Green Kitchen Stories.

Roasted Carrots with Dukkah

Serves 6

Ingredients:

  • 8 large carrots

  • 2 large parsnip (optional)

  • 4 onions

  • 2T olive oil

  • 1T maple syrup

  • Sea salt and black pepper

Directions:

  1. Preheat the oven to 200°C.

  2. Scrub the carrots and parsnip under water and trim off the tops. Cut the carrots and parsnip lengthwise if they are thick (and keep thin carrots whole).

  3. Place on a baking tray.

  4. Peel off the outer layer of the onion and trim the top off. Cut into large chunks. Place on the baking tray next to the carrots.

  5. Stir together oil, maple, salt and pepper and drizzle over the vegetables, toss to cover.

  6. Bake in the oven for 15-20 minutes or until tender.

  7. Sprinkle with dukkah. Check out our recipe here.

Dukkah

Dukkah (1).jpg

I have to ration this recipe when I make it, because it’s so damn tasty that I’m inclined to eat it raw, directly out of the jar.

Dukkah is unbelievably versatile, and makes just about anything taste amazing. I use it as a dip with life changing loaf or gluten free toast and extra virgin olive oil. I sprinkle it on green salads and roast veges to give them that extra bit of zest. Or I add it to grains such as quinoa and brown rice. It’s full of protein with the nuts and seeds, and antioxidants and digestive stimulants with the spices. All round goodness.

This recipe is a variation on a dukkah recipe by the famous vegetarian chef Ottolenghi. If you’re looking for incredible vegetarian dishes to make for dinner parties, this is the man to google. He’s literally a rock star! Enjoy.

Dukkah

Creates approximately 1 cup of dukkah

Ingredients:

1/2 cup raw cashew pieces or nuts

2T sunflower seeds

3T coriander seeds

1T fennel seeds

1T cumin seeds

2T sesame seeds

1/2 tsp sea salt (preferably malcolm harker sea salt and kelp)

Directions:

  1. Heat a frying pan to medium heat. Add the sunflower seeds, coriander seeds, fennel seeds and cumin seeds and dry roast for two minutes while stirring all the time. Add the sesame seeds and keep stirring until the sesame seeds turn light brown. Add to a mortar or a stainless steel bowl.

  2. Put the cashew pieces in the hot frying pan and dry roast them until they are light brown in colour. Keep stirring continually otherwise they will burn. When done add them to the mortar or stainless bowl.

  3. When all the ingredients have cooled add the salt and coarsely crush all ingredients with a mortar. When they have reached your desired consistency, put in an airtight container. They last for ages (though not in my household!)

Asparagus With Lemon

asparagus.jpg

Asparagus are polarising for some people, but they’re such a fantastic green to be eating in early summer, and a refreshing alternative from broccoli and spinach as it gets warmer.

This recipe is so tasty - the fresh lemon juice adds a real pop of flavour. Cooking time is also less than 10mins from beginning to end - my kind of meal!

Asparagus with Lemon

Serves 4

Ingredients:

  • 2 bunches of asparagus

  • 1-2T olive oil

  • Juice of 1/2 lemon

  • Salt and pepper

Directions:

  1. Cut the woody stems off the bottom of the aspargaus.

  2. Heat the olive oil on a large frying pan until medium hot.

  3. Saute the asparagus for 4-5mins, until slightly charred on the edges but still crispy.

  4. Take off the heat and season generously with good quality salt and pepper.

  5. Drizzle with the juice of 1/2 lemon.

  6. Serve immediately.

Green Beans With Almonds

greenbeans.jpg

Green beans pair amazingly well with grilled meats and fish. They also keep really well to have as leftover lunch the next day.

If you’ve worried about beans and legumes affecting your gut, you don’t need to be concerned about green beans. The fibre makeup is quite different, and green beans are well tolerated by those with a dodgy digestion.

Green Beans with Almonds

Serves 4

Ingredients:

  • 1T olive oil

  • 500g green beans with their ends trimmed

  • 1/2 cup of almonds, chopped into slivers

  • Juice of 1/2 lemon

  • Rind of 1/2 lemon

  • Salt and pepper

  • 1/4 tsp chilli flakes (optional)

Directions:

  1. Trim the ends off your beans.

  2. Heat 1T of olive oil in a large non-stick frypan over a medium high heat.

  3. Saute the beans for 5 mins until the beans turn bright green in colour. Don’t over cook them!

  4. Season with salt and pepper.

  5. Once they have cooled slightly, serve on a plate and drizzle with lemon juice. Top with slivered almonds, lemon rind and a pinch of chilli flakes.

Miso Eggplant

miso.jpg

This recipe is from Japan, where it is known as Nasu Dengaku

Eggplants are one of my favourite vegetables. This recipe takes two mins to prepare and is super tasty!

Miso Eggplant

Serves 6

Ingredients:

  • 3 eggplants, halved lengthways

  • 3T white miso paste

  • 2T honey or maple syrup

  • 1T tamari (gluten free soy sauce)

  • 1T vinegar (white or malt or apple cider)

  • 2T sesame oil

  • 2T toasted sesame seeds (optional garnish)

  • 1 spring onion finely chopped (optional garnish)

Directions:

  1. Preheat the oven to 200 degrees celcius.

  2. In a bowl combine the miso, honey or maple syrup, vinegar, tamari and 1T of sesame oil. Mix until it forms a smooth paste.

  3. Cut the eggplants in half lengthways and and lightly score the surface of the flesh in a cross pattern.

  4. Brush the eggplants with 1 T sesame oil and place in a baking tray flesh side up.

  5. Roast for 15mins until caramelised and soft.

  6. Remove from the oven and brush with a thick layer of the glaze.

  7. Place back in the oven and cook for another 6-8 mins until the miso os toasted and fragrant.

  8. To serve, garnish with finely chopped spring onion and toasted sesame seeds.

Cumin Roasted Cauliflower

jamiecauli1.jpg

This recipe changed me from cauliflower hater to cauliflower lover!

I think the hater came from too many sore tummies from cauliflower cheese as a kid - white sauce and cheese is never a good combo if your gut is inflamed.

This recipe is super tasty, and is equally good served warm or cold as a salad.

Cumin Roasted Cauliflower

Serves 4-6 depending on the size of your cauliflower

Ingredients:

  • 1 entire cauliflower cut into small florrets

  • 2 tsp of cumin seeds

  • 2tsp of cumin powder

  • 2T olive oil

  • Salt and pepper

  • Grated rind from 1 lemon

Directions:

  1. Preheat your oven to 180 degrees celcius.

  2. Cut your cauliflower into even sized florets and place in a baking dish.

  3. Use a brush to cover evenly with olive oil.

  4. Dust with cumin powder and sprinkle cumin seeds over the top.

  5. Season with salt and pepper.

  6. Roast in the oven for 25mins, or until the cauliflower is just starting to char on the edges.

  7. Remove from the oven and grate the rind from 1 lemon over the top.

  8. Serve hit or cold as a salad.

Cinnamon Roast Pumpkin

Cinnamon-Roasted-Butternut-Squash-Easy-butternut-squash-recipe.jpg

This recipe takes 2 seconds to prepare and is always a win. There’s nothing like roast pumpkin as a winter warmer, and the cinnamon is very kind to the digestion.

Cinnamon Roast Pumpkin

Serves 4-6 depending on the size of your pumpkin

Ingredients:

  • 1 whole pumpkin - you can use any type - crown butternut etc - with the skin removed and cut into cubes

  • 3T olive oil

  • 2-3 tsp of cinnamon powder

  • Salt and Pepper

Directions:

  1. Preheat the oven to 180 degrees celcius.

  2. Peel the pumpkin and remove the seeds. Cut into cubes approximately 2cm by 2cm.

  3. Place the pumpkin in a roasting dish and use a brush to coat in olive oil.

  4. Dust with cinnamon powder and season with salt and pepper.

  5. Roast for approximately 30mins or until each cube is soft and possibly crispy on the edges.

  6. Serve when hot.

Quinoa Tabouleh

quinoa-tabbouleh.jpg

This recipe has been one of my favourites for the last decade. Tabouleh tastes fresh and is full of parsley, which is an incredibly detoxing food for your gut and liver. However, the traditional version is made with bulgur wheat, which contains gluten and can really inflame a sensitive gut.

If you are struggling with grains in general, I suggest you soak the quinoa in cold water for two hours before cooking, then rinse thoroughly. This removes a large portion of the saponin content, which can be a culprit in upset tummies.

There are two key parts to this recipe. The first is to dice everything incredibly small - parsley and tomatoes. The second thing is to add plenty of good quality sea salt. Salt helps to break down raw food, and so will help your body to absorb the goodness in the parsley.

Quinoa Tabouleh

Serves 4

Ingredients:

  • 3/4 cup quinoa

  • 1 bunch of curly leaf parsley with the stems and leaves, chopped incredibly finely

  • 3 tomatoes or 12 cherry tomatoes chopped very finely

  • 1/2 tsp of cinnamon powder

  • 1 - 1 1/2 tsp of good quality fine salt

  • 1/2 to 1 whole lemon, depending on it’s size and to suit your taste

Directions:

  1. If you have time soak the quinoa in cold water for two hours. Rinse thoroughly and then place in a pan with 1 1/2 cups of water. Bring to the boil.

  2. Cover and reduce the heat to a simmer for about 7-10mins. It is ready when the water has been absorbed and the quinoa is translucent. Once cooked rinse with cold water in a colander to bring it to room temperature.

  3. Slice the tabouleh super fine, and dice the tomatoes into very small squares.

  4. Add the tomatoes, parsley and quinoa to a salad bowl. Sprinkle the cinnamon and salt on the top and then mix well.

  5. Squeeze the lemon onto the salad, check if more salt is required, and then serve.

Gut Healing Chicken Broth

chickenbroth.jpg

If you have a gut that is in serious distress, this is my number one recipe, and I encourage you to make a pot at the beginning of the week and make sure you have a serving every day. The combination of gelation and minerals from the chicken bones, combined with the anti-inflammatory properties of the warming spices, makes for a serious medicine that will heal and seal the lining of your gut.

You can make this soup two ways. You can buy a whole chicken and roast it, and then use the cooked carcass for the bones. Alternatively you can buy chicken frames (the raw carcass of the chicken that has been stripped of it’s breast meat, wings and legs) from your local butcher, and use 2-3 of them as the base for your soup.

Chicken is the one meat I am fastidious about buying quality free range and organic. Your standard cage chicken has huge amounts of antibiotic residue in the meat, and it feels like this could be a significant hormone disruptor, particularly in women.

In NZ there is really only one organic chicken supplier - Bostocks from the Hawke’s Bay. There is no doubt that while they create a high quality product, it is also much more expensive. I balance this by making sure I use every bit of the chicken - initially roast it, use the leftover meat to make chicken wraps, and then boil the carcass to make this soup. It’s the way we would have always done it 50 years ago, and there’s something about the process that feels wholesome and circular.

If for some reason you can’t get hold of Bostocks, opt for a free range chicken, whose diet also includes worms and grubs that they’ve foraged themselves. You’ll find the meat will carry much less water, and be far less toxic. In addition the animals will have had a much nicer life, and that also feels good in your body.

Gut Healing Chick Soup

Serves 6

Ingredients:

1T olive oil

2 yellow onions finely chopped

1 leek sliced thinly

2 dessert spoons of freshly grated ginger

4 cloves of garlic chopped finely

The leftover carcass from a roast chicken or 2-3 raw frames from a free range (organic) chicken

1T cumin seeds

1T coriander seeds

1/2 tsp tumeric

1/2 tsp chilli flakes (optional)

2 carrots finely diced

1 cube of vege stock (my favourite brand is Rapunzel - avoid anything like Oxo which will contain MSG)

Enough water to cover the meat carcass easily - keep topping up as needed

Salt - good quality and as much as you need to taste right for your palette

Directions:

  1. Gently fry the onions and leek in olive oil in your soup pot, until they are soft and starting to go translucent.

  2. Add the garlic and ginger and continue to fry for a few minutes.

  3. Put the coriander seeds and cumin seeds in a mortar and pestle and crush them gently until you start to smell their aroma. The add them to the frying spices and onions.

  4. Finally add your diced carrots, tumeric and optional chilli flakes and fry for another few minutes.

  5. At this point add your chicken (bones, chicken fat, skin and all) and your water (at least 2 L or enough to cover the chicken frames) and bring to a boil.

  6. Add 1tsp or more of salt and 1 cube of Rapunzel vege stock.

  7. Reduce to a simmer and cook for at least 3 hours - the longer the better.

  8. This soup is a broth. You can pick out the bones and whatever parts of the chicken you don’t want in the soup. Some people are not so keen on the chicken skin, so take that out before serving. If you don’t like whole pieces of vegetables floating in your soup, feel free to blend it once you’ve removed the bones.

  9. If you prefer chunkier soups, add fresh veggies at this point, such as pumkin, carrot, celery, greens, broccoli. You can blend the soup once the veges have cooked through if you prefer.

  10. Serve with life changing loaf or another gluten free bread of your choice.

  11. Alternatively when cool, place one or two person portions in ziplock bags and freeze, to pull out when you need soup or a good quality broth from which to make other soups.

Ripe Deli Raw Energy Salad

rawenergy.jpg

Ripe Deli are NZ famous for their incredible salad selection and their cookbooks, which they categorise according to the time of the year, so you are always eating seasonally.

This Raw Energy Salad is one of their most popular recipes. It tastes fantastic, but is also seriously cleansing for your gut and liver.

The raw carrot and beetroot are sweet on their own, so if you’re looking to minimise the sugar in your life, consider leaving out the raisins and honey and replacing the orange juice with lemon juice.

Raw Energy Salad

Serves 4-6

Ingredients:

4 cups of grated carrot

2 cups of peeled and grated beetroot

1 cup of fresh mint leaves, roughly chopped

1/2 cup raisins

1/4 cup of toasted sunflower seeds

1/4 cup of toasted pumpkin seeds

1/2 tsp salt

Dressing

2T balsamic vinegar

1/4 cup orange juice

1/4 cup olive oil

1T honey

Directions:

  1. To prepare the salad combine the beetroot, carrot, mint, raisins and seeds in a large serving bowl. Season with salt and mix.

  2. To prepare the dressing place all the dressing ingredients in a jar with a tight fitting lid. Shake well to combine.

  3. Dress the salad just before serving.

Salsa Verde or Green Sauce

salsaverde.jpg

This is another recipe that has changed my life.  At a certain point I realised that the key to the yumminess of all the food that I was eating in restaurants and cafes, was the condiments, not the ingredients themselves, and so I set out to have divine sauces on hand at all times.  That way simple salad ingredients become magic in a matter of seconds, and your food prep time is reduced drastically.

I developed this recipe from Jamie Oliver’s Salsa Verde, after spending lots of time in Italy marvelling at their capacity to make amazing pestos and dips.  The fantastic thing about green sauce is that you change the greens you use according to what’s in season, and what you have access to. My favourite greens are italian parsley and mint, because they sooo refreshing for your palette, but coriander and basil are also incredible.

These herbs are also amazingly good for your body, being gentle detoxifiers, and kidney and liver cleansers.  So a daily hit makes your cells sing.

I use green sauce as a dip with whole food crackers and raw veges, as a spread on life changing loaf under my eggs, as a pesto sauce with bean and legume pastas, and as a salad dressing (by thinning with a little water).  

Green Sauce

Ingredients:

1 ½ cloves garlic

1 bunch italian parsley

2 bunches of the following:  basil, mint, coriander, parsley

4T extra virgin olive oil

Juice of 1 lemon

3T red wine vinegar

2T capers

1T dijion mustard

Directions:

  1. Place all ingredients in a blender and blend at medium speed until all the ingredients have merged.

  2. If you prefer a coarser version, cut all the herbs, garlic and capers by hand and mix with the wet ingredients.  You can also blend less so the consistency is less smooth.

  3. Keep in the fridge for 4-5 days.   

Easiest Salad Dressing Ever

balsamic.jpg

This is my go to salad dressing when I have no creativity or time left, and I just need to throw something together and get myself (and others) fed.

The tamari is a gluten free and MSG free soy sauce that has been produced more in accordance with traditional fermenting practices. You can buy it at most supermarkets or health food stores, and I just keep it in my pantry instead of soy sauce, it tastes identical without any of the nasties.

In this recipe the tamari adds the saltiness, which is the key ingredient in any salad. Have you ever wondered why salads taste so much better when you get them in a restaurant? It’s because they’ve been seasoned appropriately. If you are using the right salt it is a source of multi minerals, as well as being very important in salads to augment the digestion of the raw vegetables. So don’t hold back!

Also be sure to use good quality extra virgin olive oil. Does the extra virgin part make a difference? Absolutely. This means the olives have been pressed without using heat or other solvents, which protects the amazing antioxidants in the oil. So this is not an area to skimp on. Buy in bulk from a wholefoods discount store and be liberal with your use of oil. Good quality extra virgin olive oil also tastes amazing! Yum!

Easiest Salad Dressing Ever

Makes as much as you want

Can store for up to 2 weeks or longer in the fridge

Ingredients

1 part apple cider vinegar

1 part extra virgin olive oil

1 part tamari

Directions

  1. Get a jar. Add all the ingredients in proportion, in as much volume as you need. I’ll often make up a quater of a jar’s worth, and use it on my salads throughout the week.

  2. Put the lid on the jar and shake it in order to mix all the ingredients thoroughly.

  3. Pour on your salad just before serving.

TIP: Don’t dress the salad in the salad bowl, instead offer it undressed with the dressing on the side, so people can add it to their salad on the plate. That way if there are salad leftovers, you can put them in a container for lunch the next day, and they won’t have gone soggy and yuck.